Sunday, August 22, 2010

Rear Derailleurs

A rear derailleur is designed to move (or derail) a chain from one sprocket to the next. It pushes the chain sideways, so that it runs at an angle onto the sprocket, instead of straight. When the angle becomes sharp enough, the chain can no longer mesh with the sprocket. It then falls off the sprocket and lands on the one next in line. When the chain is being shifted from a smaller sprocket to a larger one, the chain will rub on the side of the larger sprocket until it gets snagged onto its teeth. It is composed of two pulleys (upper is guide pulley, lower is tension pulley) in a spring-loaded rotating cage, through which the chain rolls in an S-shaped pattern.

For the common rear derailleur, increasing inner wire tension moves the rear derailleur to the left (towards the spokes). Decreasing inner wire tension moves the derailleur to the right. For instance, when you climb a hill and switch to a lower gear, you pull the shift cable to force the pulley to change to a bigger sprocket.


The derailleur body is fitted with a spring that is pulled tight or relaxed by the inner wire. Pulling the inner wire tightens the spring and moves the cage/pulley to the left.

Adjusting the Rear Derailleur: Limit Stops
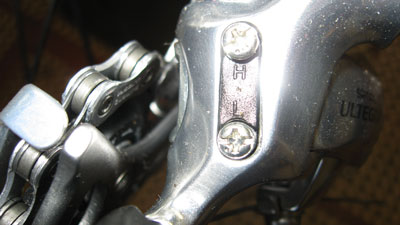
The limit stops/screws set the limits of how far the derailleur can move from left to right, but are not intended to move the derailleur. Loosening a limit allows the derailleur to be moved farther in a certain direction whereas tightening a limit restricts its motion. The ends of the screws bump into internal parts of the parallelogram when the derailleur has moved all the way in the direction controlled by that screw. Turn clockwise to tighten and counterclockwise to loosen.
  • High Gear Limit Stop
    • In order to adjust it properly, there must be no tension on the lower inner cable. If you feel tension, loosen the cable adjuster (turn it clockwise) until there is none.
    • When adjusting, check for two solutions:
      • The outward shift from the second sprocket to the outermost sprocket
      • How the chain rides on the outermost sprocket
    • Proper adjustment: When H-screw is at its tightest acceptable setting
B-Screw AdjustmentModern derailleurs have 2 spring-loaded pivots. The lower pivot winds the cage up to take up slack as you go to smaller sprockets. The upper pivot, controlled by the b-screw, adds additional slack take-up ability by pushing the derailleur's parallelogram backwards. The tension of the two springs needs to be balanced for best shifting.

The B-screw controls the derailleur's body angle in relation to the sprocket set. This screw adjusts the tension of the upper spring/pivot of the parallelogram and thus, the height of the jockey pulley. The looser this screw is, the closer the jockey pulley will be to the cluster.

Since a derailleur shift is caused by forcing the chain to run at an angle, the greater the angle,
the sooner it will shift. The closer the jockey pulley is to the cluster, the sharper the angle will
be for a given amount of sideways motion of the derailleur. Thus, the looser the b-screw is, the better the shifting will be.
  1. Shift down to the innermost rear cog (lowest gear) and innermost front cog (smallest chainring) and check the distance between the guide pulley and the largest sprocket.
  2. If the pulley is rubbing against the cog, tighten the B-screw (clockwise) to increase tension which will move the pulley away from the sprocket.
  3. If there is a large gap between the pulley and sprocket, loosen the B-screw until the pulley rubs the sprocket and then tighten it until it just clears.
Indexing AdjustmentThe rear derailleur indexing is adjusted by changing the inner wire tension at the adjusting barrel. For common rear derailleurs, increasing wire tension (counter-clockwise) moves the derailleur to the left. Decreasing wire tension (clockwise) moves it to the right. (Shimano or "Low Normal" derailleurs operate differently)

The goal of adjusting indexing is to find the tightest inner wire tension that will allow good shifting to the gears normally used. This will allow the longest lasting indexing adjustment as the system wears and the cable system stretches with use. To find the tightest inner wire setting, you will purposely make the setting too tight then relax the tension slightly.

Two basic symptoms for a "too tight" inner wire:
  1. A rattling noise from the chain rubbing against the next cog inward
  2. A slow or hesitant outward shift
You should also make sure that the derailleur is not bent: the two pulleys should be lined up exactly underneath one another, so that the chain runs straight up from the tension pulley to the jockey pulley, with no sideways slant.

Saturday, August 21, 2010

Chains

A bicycle chain is a roller chain that transfers power from the pedals to the bicycle wheel, thus propelling it. Chains are made up of a repeating series of inner plates, a roller, a chain rivet, and outer plates. The chain rivet presses into both outer plates, but the rivet slides freely through the inner plates and the roller. Chains have a small amount of play at each link, even when brand new. As a chain is ridden, it wears the rivets and the play at each link increases. This is sometimes called "stretch," although the plates do not literally become longer.

What happens when a chain is worn out?


A worn chain will not engage the cogs correctly and will eventually slip over the cog teeth when pressure is applied. It will also wear down the gear teeth. Therefore, neglecting the chain means you not only have to replace the chain (fairly cheap) but now you also have to replace the chain rings and probably a few cogs on the rear gear cluster as well. It's much cheaper to replace the chain in a timely manner.

Derailleur Capacity: Refers to the derailleur's ability to take up chain slack as the derailleur shifts between different gear combinations. If the derailleur capacity does not match the gear sizes on a bike, the chain may appear to fail either the "too long" or the "too short" test.

Chain Size
  1. Pitch
    • Distance between rollers (1/2" on all modern bicycle chains)
    • Measuring a bicycle chain's pitch can be used to identify chain wear and flag the need for a replacement chain and/or cogs and chainrings
  2. Width
    • Internal width where the sprocket teeth fit in A.K.A. distance between the two inner plates
    • Related to the maximum thickness of a sprocket that can realistically engage with the chain and that dictates the thickness of gears which in turn is specific to the type of bike. Typical sprocket thicknesses range from 1.7mm to 2mm.
    • Comes in two typical widths:
      • 1/8": standard width of a BMX bike chain and also on most single-speed bikes
      • 3/32": standard width for all modern multi-speed bikes. These chains are commonly referred to as "derailleur" chains
Chain manufacturers typically use the number of gears as the way to differentiate chains for a 10 speed bike vs a thicker chain for a 9 speed bicycle. You'll commonly see "10s" or "9s" in the listings rather than referring to the actual measured external width, although often this information is available as well.

How to determine the bicycle chain size you need:
  1. Chain Internal Width: 3/32" for derailleur bikes
  2. Chain External Width: i.e., 10s
  3. Chain Pitch: Typically 1/2"
  4. Sprocket Shape: Shimano v.s. SRAM
How to check for chain wear

Measure the chain by placing the ruler's "0" mark directly above the center of one of your chain pins. Now count 12 complete links. A complete link equals 1 inner and 1 outer (apprx. 1"). A rivet on a new chain should line up exactly with the 12 inch mark using this method.
  • Wear Indicators
    • If the rivet is less than 1/16" past the mark, your chain is okay
    • If it's between 1/16" and 1/8" past the mark, you'll likely need a new chain, but your sprockets should be okay
    • If it's more than 1/8" past the mark, you'll have to replace both the chain and the rear sprockets
      • Why? Because the rear sprockets generally wear with the chain. While the chain is "stretching," the gap between the teeth on your sprockets also gets wider and wider. This causes the chain to ride up over the teeth and slip while pedaling under pressure.
How to calculate the right chain length
  1. Use the old chain length
    • Before removing the old chain, check the bike for acceptable length. If there is sag (too long), then subtract 2 chain rivets. If too short, ("S" bend as chain passes through the pulley wheels when it's on the largest chainring and second largest rear cog)
  2. Measure off the largest cog and chainring
    • Remove the old chain. Shift into the front largest chainring and smallest rear cog. Wrap the chain around the largest cog and chainring but do NOT run the chain through the rear derailleur. Bring the ends together on the front chainring until they can be just connected, then add one extra link to the length (should = 1").
  3. Chain sizing by equation
How to break a "standard" chain
  1. Check to make sure there isn't a quick-release link.
    If there is no master link and is not a Shimano chain, the chain is known as a "standard" chain. It is a disappearing breed as bikes now have more rear cogs and correspondingly narrow chains.
  2. Take the chain tool and back out the pin by turning the handle counterclockwise. The outer cradle is used to connect/disconnect chains. The inner cradle loosens stiff links. Place one of the chain links on the outer cradle.
  3. Tighten the handle clockwise until the chain tool's pin connects with the end of your chain pin. Continue tightening until the handle starts showing resistance. Take off the chain tool. There should be about 1mm or so of rivet protruding.
  4. Twist and pull to disconnect the chain.
  5. Watch the derailleur. It will swing back. Carefully note how the chain was routed through it.
How to install a new chain
  1. Determine chain length
  2. Shift to smallest front and smallest rear cog (to have max slack to work with)
  3. Make sure the pin is pointing away from the bike before you start
  4. Starting with the bottom pulley, guide the chain up and through the rear derailleur, over the smallest rear cog and through the front derailleur. Bring the chain ends together around the smallest front chainring.
  5. Push the ends together, snapping the end link over the little stub of pin. Use the chain tool to push the pin back in until it's flush at the other end.
  6. The process of re-connecting the chain has caused the chain links to compress together, making a stiff link. To fix this, use the inner slot on the chain tool and tighten it just barely, about a quarter of a turn.
NOTE: Most chain failure is due to one of the pins being improperly installed.

Shimano ChainShimano chains have a special connecting pin called a "subpin" to ensure a stronger chain connection. The 7 and 8 speed chains use a black connecting rivet and 9 speeds use a silver connecting rivet. When disconnecting a Shimano chain, be sure to select a chain rivet identical to adjacent rivets. Do not select a previously installed connecting rivet or a rivet immediately adjacent to a connecting rivet.

Connecting a Shimano Chain
  1. Remove any extra links, pushing the appropriate rivet completely out
  2. Line up the chain ends
  3. Push the subpin in with your fingers, pointed end in first. It will go in about halfway
  4. With the chain tool, push the subpin through until there is only as much left protruding at the tail end as the other rivets in the chain.
  5. Break off the leading half of the subpin with a pair of pliers.
  6. The chain should move freely. If it does not, flex it back and forth to relieve the stiff link.
Master Links (below covers 2 common types, both of which only need pliers to connect/disconnect)
  • Type #1: Found on BMX and single-speed bicycles. There are 3 parts: one link plate with two chain pins attached, a plate with no chain pins that slide on the other side, and a clip that holds the link together once installed.
Disconnecting Type #1:

Place the jaws of your pliers on the chain pin and the other jaw on the other open end of the clip. Then squeeze your pliers until the clip pops off. Then you can remove the outer plate and slide out the rest of the link.

Reconnecting Type #1:

Slide in the link with the chain pins, place the outer plate on the other side, and then put the clip back in place. This time, place one jaw of your pliers on the closed end of the clip, and the other jaw on the opposing chain pin. Then squeeze them together until the clip snaps into place.
  • Type #2: Found on derailleur chains. There are only 2 parts: each of the two plates are identical and each has a chain pin on one end.
Disconnect Type #2:

Place pliers on opposing ends of the link. and then squeeze the pliers together until you hear a click. Now you can slide both links out.

Reconnect Type #2:

Slide both ends of the link together and then rotate your chain on the bike until the quick release is on the top and the pedal is facing forward. With both wheels on the ground, compress your brakes so your bike doesn't move. Then step down on the pedal. The links should snap into place.

How to Clean your Chain
  1. Shift the chain to the smallest rear sprocket.
  2. Wipe the chain clean with a solvent soaked rag, by holding the chain still at the rear derailleur cage while firmly wiping the lower run of the chain. Then, move the chain backwards and wipe again until you've wiped the entire length of chain.
  3. Wipe between the rear sprockets, cogs, and jockey pulleys
  4. Use a rag dipped in water to wash off the solvent.
How to Lube your Chain
  1. Shift to the middle sprocket in the front and rear. Remember, oil does a good job of spreading itself so do not try to over-apply the lubricant.
  2. Run the chain backwards while dropping oil down both sides of the rollers.
  3. Shift through all the gears to spread the lube evenly through the drivetrain
  4. Drop a few drops of lube into the cassette
  5. Use a rag to wipe off any excess oil
How to troubleshoot a squeaky chain:
(
Squeaking is caused by dry or rusted surfaces inside the chain rubbing on each other)
  1. Wipe down and lubricate the chain
  2. If the squeak does not go away, replace the chain.
    If the initial remedy does not work, the chain is too dry inside and probably rusted as well. Chains seldom heal from this condition)

Pedals

The pedal is the part you put your foot on. The axles of the pedals screw into the cranks.

Pedal Threading
  • Direction
    • The right pedal has a normal thread but the left pedal has a left (reverse) thread
  • Thread Sizes
    • Three-piece cranks, one-piece, and old french differ in tpi
Pedal Types
  1. Plain/platform pedals:
    Rely on the rider's coordination to keep the foot properly located on the pedal.
  2. Toe-clip pedals
    Work with stirrup-like clips and adjustable straps to hold the foot in place. Can be used with normal street shoes or with special cleat shoes.


  3. Clipless pedals
    Requires a special cycling shoe with a cleat fitted into the sole, which locks into a mechanism in the pedal, holding the shoe firmly to the pedal.
Tools for Pedal Removal and Installation

1. 15-mm pedal wrench
2. Grease

How to Remove Pedals
  1. Mount bike on repair stand and shift chain to the largest chainring to help protect against cuts from the chainring teeth
  2. Place the wrench into the pedal wrench flat so that the wrench and the crank form a 90 degree angle or less (to maximize mechanical advantage)
  3. Turn the pedal wrench counterclockwise to remove the right pedal or turn the crank so that the pedal is pedaling forward. Remove the pedal completely from the crank.
  4. Since the left pedal has a reverse thread, loosen the left pedal by turning the pedal wrench clockwise.
Some models and makes of pedals do not use a pedal wrench plant. These pedals will typically have an 8 mm hex fitting on the back side of the pedal wrench.

Installing Pedals
  1. Begin by identifying the left and right pedal. Look for an 'L' or 'R' marking on the wrench flats. If there are no 'L' or 'R' markings, use the pedal thread direction to identify pedals. (Left thread slopes upward to the left)
  2. Heavily grease threads of both pedals
  3. Using fingers on wrench flats, thread right side pedal into the right crank. Tighten the right pedal by turning clockwise.
  4. Tighten the left pedal by turning counter-clockwise.
ParkTool - Pedal Installation and Removal

Bicycle Tutor - How to Replace Your Pedals

Friday, August 20, 2010

Bottom Brackets

Bottom Brackets - Tools and Terminology

The bottom bracket is the component that connects the crankset to the bicycle and allows the crankset to revolve freely and experiences more torque than any part of the bike (letting it wear out very quickly). It contains a spindle to which the crankset is attached and the bearings that allow the spindle and cranks to rotate. The bottom bracket fits inside the bottom bracket shell. There are 3 common types of bottom brackets:
  1. Sealed Cartridge: Normally two pieces, a unit holding the spindle and bearings that screws into the bottom bracket shell from the drive side and a support cup that supports the spindle/bearing assembly on the non-drive side. Other designs are three-piece. Servicing the BB is a simple matter of removing the old cartridge and installing a new one.
  2. Cup-and-cone: Contains four major pieces: lockring, adjustable cup, spindle and fixed cup. The non-drive side lockring has notched rings and the adjustable cup may have holes for a pin spanner, or notches for a wrench. The drive side (fixed cup) will have wrench flats, but no lockring. This type of BB can be adjusted and should be serviced regularly.
  3. One piece/"Ashtabula": Found on older Schwinns, juvenile bikes, some BMX bikes and on many department store-style bikes. It is composed of one piece of steel and though they are heavy, they are very reliable and the easiest to service. You can completely overhaul this type with just a large adjustable wrench and screwdriver.

When to service/adjust your BB:
  1. If the BB is loose:
    • Test by grabbing both cranks and pushing and pulling laterally (not towards front and rear)
  2. If the ball bearings are worn out:
    • Test by first taking the chain off the chainring and spinning the cranks while holding the frame with one hand. If you feel a rumbling/grinding, the bearings or cartridge should be replaced. Ball bearings wear out last, so replacement of the internal parts (cups, spindle) will most likely be necessary.
  3. If the crankset has play:
    • i.e., rocking and creaking, then your BB is most likely loose and needs tightening
Tools for overhauling and re-greasing an adjustable type bottom bracket
  • To remove the cranks:
    1. Crank puller
    2. 8mm allen key or 14mm socket wrench
    3. (depends on crank puller) 16 mm open end wrench and large adjustable wrench
  • To overhaul the bottom bracket:
    1. Bottom bracket wrench OR a pin spanner


    2. Hooked lock ring wrench

    3. 36-mm wrench
  • To re-grease the bearings:
    1. Cleaning solvent2. Waterproof Grease3. Rag
    4. Toothbrush
How to disassemble an adjustable type BB
  1. Remove the cranks
  2. Loosen and remove the lock ring on the non-drive side by turning counter clockwise
  3. Loose and un-thread the non-drive side bearing race using either a pin spanner or BB wrench
  4. Pull the spindle and both bearing cages out of the frame. It is important to remember which way the spindle came out, as they are directional. The drive side usually has a longer distance from the bearing race to the end of the threads.
How to service an adjustable type BB
  1. Wipe off the bearing cages and drop them in solvent
  2. Use the rag to clean both the spindle and outer bearing races
  3. Tighten the drive-side bearing race by turning counter-clockwise with your 36mm wrench. No need to remove it.
  4. Inspect both bearing races and spindle for pitting and wear. Most wear occurs on the spindle's bearing races. If there is pitting, replace it.
  5. Clean both bearing cages with a toothbrush and solvent, and then set them aside to air-dry.
  6. Apply a layer of grease on both bearing races and cages.
  7. Place the bearing cages in both races. The rounded side of the cage should be facing down into the bearing race.
How to reassemble an adjustable type bottom bracket
  1. Insert the spindle from the non-drive side and wipe off any excess grease that comes out.
  2. Grease the threads inside the BB shell
  3. Slide the outer race and bearing cage onto the spindle and thread it on all the way clockwise, but don't tighten it
  4. Wipe off excess grease.
How to adjust an adjustable type bottom bracket
  1. Thread on the lock ring finger tight
  2. Install the drive-side crank and tighten it. This will help to make a proper adjustment.
  3. Hold the inner race firmly with your wrench and tighten the lock ring.
  4. When properly adjusted, the spindle should spin smoothly. If it doesn't, loosen the lock ring, back off the inner race a little bit and then tighten again.
  5. Check for play by placing the crank arm close to the frame and pushing/pulling it against the frame. There should be no movement. If it feels loose, loosen the lock ring and tighten the inner race.
  6. When the adjustment is correct, install the left crank.
Tools for replacing a cartridge bottom bracket:
  1. Splined bottom bracket tool
  2. 32 mm headset wrench or a large adjustable wrench
  3. Grease
How to remove a cartridge bottom bracket
  1. Remove both cranks
  2. Remove the non-drive side first, using the splined BB tool and the wrench by turning counter-clockwise
  3. Remove the drive side by turning clockwise

How to install a cartridge bottom bracket
  1. Clean and grease the threads on the BB and inside the frame
  2. Thread the new lock ring part way into the non-drive side of the frame by turning it clockwise. Do not tighten.
  3. Thread the cartridge all the way into the drive side of the frame by turning counter-clockwise.
  4. Tighten it with about 25-30 foot-pounds of pressure using a torque-wrench
  5. Finish tightening the left side clockwise until it's nice and snug
ParkTool - Adjustable Bottom Bracket Service

BicycleTutor - How to Overhaul a Bottom Bracket

How to Replace a Cartridge Bottom Bracket

Cartridge Bearing Type Bottom Bracket Service

Cranks


Photo Credit: abc-of-mountainbiking.com

A crank is the arm that connects the pedal to the bottom bracket spindle. They must be removed to service the bottom bracket spindles. Depending on the crank model, some may need to be removed to replace he chainrings. A crankset consists of two cranks, chainwheels, and stack bolts that hold the chainwheels to the spider of the crank.

Cranks and usually differentiated by the bolt circle diameter (BCD).
  1. Bolt-circle diameter is the diameter of the circle formed by the stack bolts. It determines chainring interchangeability and is dependent on the number of spider "legs" (four or five). Common double-chainwheel sets use 130mm or 110mm diameters. The corresponding minimum chainring sizes are 38mm and 34mm respectively. Choosing a standardized BCD gives you the freedom to mix and match chainrings; choosing a (often cheaper) unique BCD forces you to have to that specific manufacturer's chainrings.

    Modern triple chainring sets have 2 BCDs, a large one for the outer two chainrings and a smaller diameter, with a separate set of bolts, for the granny ring. Full size triples usually use 110mm/74mm or 130/74 (newer). Compact triples often use 94/58.
    You can also figure out BCD by measuring the "center-center" distance (easier to measure). A 76.4mm c-c distance, for instance, matches up with a 130mm BCD.

Photo Credit: bikehounds.ca

Cottered cranks are an older technology of attaching cranks to the bottom bracket spindle, by the use of "cotters," wedge-shaped pins threaded through one side and secured by a nut. They become increasingly difficult to remove over time. Much harder to maintain and install than cotterless cranks. The cotter press is used to remove cotter pins.

Cotterless cranks are the modern version cranks. The bottom bracket spindle used with cotterless cranks has tapered square ends which fit into the matching tapered square holes in the cranks. The ends of each axle is threaded and a "fixing" bolt/nut pulls the crank tightly into the end of the axle. The fixing bolt/nut provides a purchase for the crank puller.

Tools for Removing Cotterless Cranks:

1. (To remove the bolt/nut) 8 mm allen key (newer bikes) OR 14mm socket wrench (older bikes)

2. Crank Puller is the tool for removing cotterless cranks.

3. 16mm open end wrench. (If crank puller has no handle)


4. Adjustable wrench (If crank puller has no handle)

Removing Cotterless Cranks (Square Spindle Type)
  1. Shift the chain to the largest chainring to protect your hands from the teeth.
  2. Remove the dust cap and bolt/nut. Inspect for and remove any washers present.
  3. Fully extend the puller nut of the crank puller. It should be turned away from the internal driver as much as possible (turn counterclockwise). If it comes off, thread it back on with 3 to 4 turns.
  4. Screw the large external threads of the puller nut all the way into the dustcap threads. Take care not to crossthread and do not overtighten the nut.
  5. Tighten the internal driver into the puller nut.
  • If the crank puller has no handle: once the crank puller is fully threaded, place the adjustable wrench onto the external flats and turn the internal driver clockwise until it stops. Turn the driver clockwise using a 16mm wrench until the crank pulls free from the spindle.
Crank Arm Installation
  1. Wipe off both the square spindle and the crank's spindle fitting to ensure there is no dirt/grease.
  2. Grease under the head and along the threads of both bolts.
  3. Slide the right crank's spindle fitting onto the spindle.
  4. Thread the bolt all the way into the spindle threads and torque the bolt to about 420 inch-pounds.
  5. Repeat the same installation on the opposite side, making sure the left crank is pointing opposite the right.
Additional Installation/Removal Links:

cotterless)">Bottom Bracket Teardown (cottered --> cotterless)
How to remove a crank from your bicycle square taper YT
Bicycle Tutor - How to Replace Cotterless Cranks
Park Tool - Crank Installation and Removal: Square Spindle Type