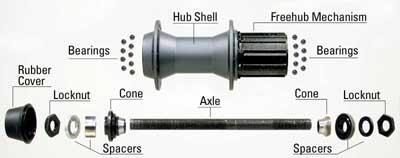
There are two general types of hubs:
- Adjustable cup-and-cone: has loose ball bearings that can be adjusted for bearing play
- Cartridge: the bearings, races, and cones are all assembled as a complete cartridge unit.
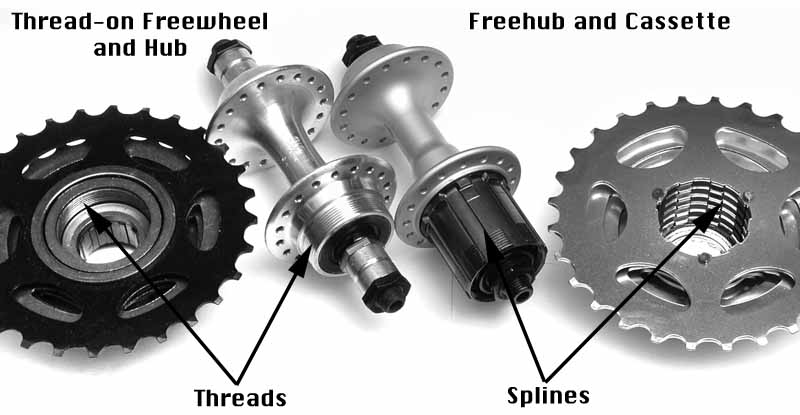
The freewheel is the mechanism that makes coasting possible. A ratchet mechanism allows the rear sprockets to drive the wheel forward but also allows the wheel to turn forward independently even when the sprockets are not turning. Freewheels are commonly sold with the sprockets attached, so this term is frequently used as a synonym for a cluster. A standard freewheel attaches to a hub by screwing on external threads that are part of the hub. The action of pedaling tightens the freewheel down to the threads, so no tools are required for installation. Removing a freewheel requires a special tool known as a "freewheel puller/extractor".
The freewheel puller/extractor is a splined unit that may be mounted on a vise or turned with a wrench. The splines engage matching splines in the interior (non-rotating) part of the freewheel body. Different brands of freewheels have used different spline patterns, but there is a recent tendency to standard on the Shimano pattern.
 The freehub is the Shimano trademark for a rear hub in which the freewheel mechanism is built into the hub itself, rather than being part of the sprocket cluster.
A cluster is a group of rear sprockets on a multi-speed bicycle. If the bicycle uses a thread-on freewheel, the term "cluster" would include the entire assembly including the freewheel mechanism. In the case of a cassette hub, the "cluster" would only consist of the sprockets and the spaces that separate them.
A cassette is a cluster of sprockets and spacers designed for use on a freehub. Some of the sprockets and spacers may be semi-permanently attached on one another by bolts or rivets.
What is the main difference between freewheels and cassette freehubs?
Traditional rear hubs come with a standardized set of threads to which a standard freewheel/sprocket cluster can be screwed onto. This allowed any brand of freewheel to be mounted on any brand of hub. If you wore out your sprockets, or wanted different gear ratios, you could unscrew the cluster and install a new one. Almost all bikes through the late '80s used this system.
Over the last few years, the Shimano freehub has largely replaced the conventional threaded rear hub. These hubs work better but you can no longer interchange hubs.
Why do you need to overhaul your hubs?
To maintain performance levels. Once dirt enters the bearing system, it acts like sand paper grinding down all the moving parts.
Tools to overhaul an adjustable hub:
- Rags
- Grease
- 17mm open end wrench

- 13mm cone wrench for the front hub
- 15mm cone wrench for the rear hub

- Remove the quick release skewer
- Place the wheel on its side and slide a cone wrench onto the cone flats and then loosen the locknut with the 17mm open end wrench by turning it counter-clockwise against the cone wrench
- Completely unthread and remove the cone, locknut and any washers
- Put your hand over the end of the hub from which you removed the nuts and spacers (to catch bearings) and flip the wheel over. Have a rag underneath to catch stray bearings.
- Slide the axle out fro the right side of the hub. Unless your axle is bent and needs replacing, leave the cone and locknut in place. If you do need to replace it, measure the amount of axle sticking out beyond the locknut.
- With a screwdriver, gently pop off the seals that are pressed into either end of the hub shell. Be careful not to deform them; leave them on if you can't pop them out without damage.
- Clean off all of the old grease off of the axle and cones and remove all of the bearings from both sides, making sure to count how many you take out.
- Clean the insides of the hubs thoroughly and carefully inspect both the cones and the inner bearing races. Use a ballpoint pen to trace the bearing path. Roughness and wear twill be felt as the small ball of the pen passes over pits. If there is any damage such as pitting then the cone and/or hub should be replaced.
- If you don't replace the ball bearings, make sure to clean them thoroughly by rubbing all of them between two rags. A lack of sheen on either balls or cones indicates wear and is cause for replacement.
- Press the dust covers in both ends of the hub shell
- Grease heavily inside the hub shell cup. Sheldon Brown says it's impossible to use too much.
- Carefully insert all of the new bearings by pushing them down into the grease. When all of the bearings are installed, there should be at least half a bearing space left. Cover all bearings with a layer of grease.
- Lightly grease the axle threads and the cone that is still attached to the axle and then slide the axle into the hub shell. Lift the wheel up a bit (30 degree angle) so that you can push the axle in until the cone slides into position and keeps all the bearings in place.
- Holding the axle pushed inward with one hand to secure the bearings, turn the wheel over.
- Smear grease into the bearing race that is now facing up. Lift the wheel and allow the axle to slide down just enough so that it is not sticking up past the bearing race. Make sure no bearings fall out of the bottom.
- While the top end of the axle is still below the bearing race, place the remaining bearings uniformly around the grease.
- Slide the axle hub back into place by setting the wheel down on the table, so that the cone is seated up into the bearings.
- With your fingers, screw the top cone into place, seating it snugly onto the bearings. Covering the top cone with a film of grease is also a good idea.
- In the correct order, slide on the washer and any spacers. Watch for those washers with a little tooth or "key" that fits the lengthwise groove in the axle.
- Use your fingers to screw on the lock nut. Note that the two sides of the locknut are not the same.
You
No comments:
Post a Comment