 Photo Credit: abc-of-mountainbiking.com
A crank is the arm that connects the pedal to the bottom bracket spindle. They must be removed to service the bottom bracket spindles. Depending on the crank model, some may need to be removed to replace he chainrings. A crankset consists of two cranks, chainwheels, and stack bolts that hold the chainwheels to the spider of the crank.
Cranks and usually differentiated by the bolt circle diameter (BCD).
Cranks and usually differentiated by the bolt circle diameter (BCD).
- Bolt-circle diameter is the diameter of the circle formed by the stack bolts. It determines chainring interchangeability and is dependent on the number of spider "legs" (four or five). Common double-chainwheel sets use 130mm or 110mm diameters. The corresponding minimum chainring sizes are 38mm and 34mm respectively. Choosing a standardized BCD gives you the freedom to mix and match chainrings; choosing a (often cheaper) unique BCD forces you to have to that specific manufacturer's chainrings.
Modern triple chainring sets have 2 BCDs, a large one for the outer two chainrings and a smaller diameter, with a separate set of bolts, for the granny ring. Full size triples usually use 110mm/74mm or 130/74 (newer). Compact triples often use 94/58.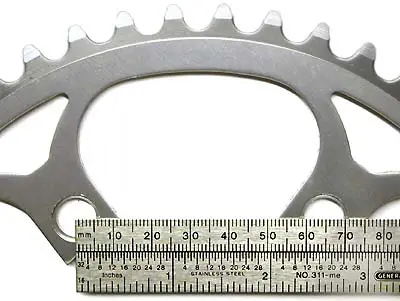 You can also figure out BCD by measuring the "center-center" distance (easier to measure). A 76.4mm c-c distance, for instance, matches up with a 130mm BCD.

Photo Credit: bikehounds.ca
Cottered cranks are an older technology of attaching cranks to the bottom bracket spindle, by the use of "cotters," wedge-shaped pins threaded through one side and secured by a nut. They become increasingly difficult to remove over time. Much harder to maintain and install than cotterless cranks. The cotter press is used to remove cotter pins.
 Cotterless cranks are the modern version cranks. The bottom bracket spindle used with cotterless cranks has tapered square ends which fit into the matching tapered square holes in the cranks. The ends of each axle is threaded and a "fixing" bolt/nut pulls the crank tightly into the end of the axle. The fixing bolt/nut provides a purchase for the crank puller.
Tools for Removing Cotterless Cranks:

 1. (To remove the bolt/nut) 8 mm allen key (newer bikes) OR 14mm socket wrench (older bikes)
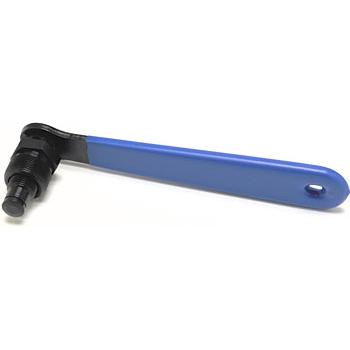 2. Crank Puller is the tool for removing cotterless cranks.
 3. 16mm open end wrench. (If crank puller has no handle)

4. Adjustable wrench (If crank puller has no handle)
Removing Cotterless Cranks (Square Spindle Type)
cotterless)">Bottom Bracket Teardown (cottered --> cotterless)
How to remove a crank from your bicycle square taper YT
Bicycle Tutor - How to Replace Cotterless Cranks
Park Tool - Crank Installation and Removal: Square Spindle Type
Cotterless cranks are the modern version cranks. The bottom bracket spindle used with cotterless cranks has tapered square ends which fit into the matching tapered square holes in the cranks. The ends of each axle is threaded and a "fixing" bolt/nut pulls the crank tightly into the end of the axle. The fixing bolt/nut provides a purchase for the crank puller.Tools for Removing Cotterless Cranks:
1. (To remove the bolt/nut) 8 mm allen key (newer bikes) OR 14mm socket wrench (older bikes)2. Crank Puller is the tool for removing cotterless cranks.3. 16mm open end wrench. (If crank puller has no handle)4. Adjustable wrench (If crank puller has no handle)
Removing Cotterless Cranks (Square Spindle Type)
- Shift the chain to the largest chainring to protect your hands from the teeth.
- Remove the dust cap and bolt/nut. Inspect for and remove any washers present.
- Fully extend the puller nut of the crank puller. It should be turned away from the internal driver as much as possible (turn counterclockwise). If it comes off, thread it back on with 3 to 4 turns.
- Screw the large external threads of the puller nut all the way into the dustcap threads. Take care not to crossthread and do not overtighten the nut.
- Tighten the internal driver into the puller nut.
- If the crank puller has no handle: once the crank puller is fully threaded, place the adjustable wrench onto the external flats and turn the internal driver clockwise until it stops. Turn the driver clockwise using a 16mm wrench until the crank pulls free from the spindle.
- Wipe off both the square spindle and the crank's spindle fitting to ensure there is no dirt/grease.
- Grease under the head and along the threads of both bolts.
- Slide the right crank's spindle fitting onto the spindle.
- Thread the bolt all the way into the spindle threads and torque the bolt to about 420 inch-pounds.
- Repeat the same installation on the opposite side, making sure the left crank is pointing opposite the right.
cotterless)">Bottom Bracket Teardown (cottered --> cotterless)
How to remove a crank from your bicycle square taper YT
Bicycle Tutor - How to Replace Cotterless Cranks
Park Tool - Crank Installation and Removal: Square Spindle Type
No comments:
Post a Comment